
 |
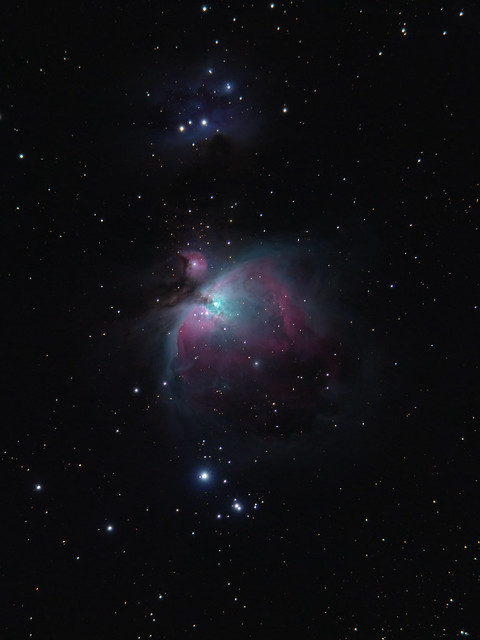
| M42, Orion: Tele Vue 60 + Canon 80D + Vixen Super Polaris |
"An unformed fiery mist, the chaotic material of future Suns" - William Herschel, 1789Herschel's description (written long before spectroscopy revealed the true nature of gaseous nebulae) could hardly have been more prescient. The Great Orion Nebula (Messier 42) is indeed a cradle of new stars (at 1,300 light years, the nearest star-forming region to our own sun), visible to the naked eye as a misty patch in Orion's Sword on winter nights.
Viewing M42
I'm occasionally asked what it looks like through a telescope: a one-word answer would be "Majestic", but don't expect to see the full extent of the nebula - or indeed the vivid colours that you get in photos like the one above. As with most deep-sky objects, the Orion Nebula rewards careful and prolonged examination. Here's a sketch I made a long time ago (for GCSE Astronomy coursework!) illustrating the typical low-power view through a small telescope under suburban skies:

So far the weather has only allowed me one opportunity to look at M42 with the XT10, but even under less than ideal viewing conditions it was immediately obvious that the extra aperture had improved the view dramatically. The core region had a strong green tint and averted vision made it so bright that the Trapezium was almost lost in the glare. Lots of finely detailed structure was visible with dark rifts cutting through the nebulosity. The Ultrablock filter wasn't really necessary for such a bright object, but it did seem to increase the overall extent of the nebula, particularly on the northern side.
Photographing M42
For any birders who've made it this far, the Orion Nebula is arguably to astrophotography what the kingfisher is to bird photography, the gateway drug that lures you into a lifetime hobby. (It even comes with its own fish, of a sort.) The image at the top of this post is a stack (not a mosaic) of 108 thirty-second exposures (plus 15 dark frames and 21 flat frames). As I'm still shooting unguided (for now) I've been careful not to choose targets too far away from the celestial pole, so at -5 degrees declination M42 presented the biggest test yet of my polar alignment accuracy. Fortunately the Great Nebula is a forgiving target - you can pull out a considerable amount of detail and colour even with relatively short 30-second subs. If you look closely, some slight trailing is evident, but not enough to spoil the final image.
Processing M42
As I've said before, acquiring all the light-frames (plus darks and flats) is only half the battle; there's still a lot of work to do. The image above was assembled using the freeware program Sequator. Compare it with my first attempt using the more widely-known freeware DeepSkyStacker. The samples on the Sequator website suggest it's optimised for landscape astrophotography (i.e. wide-angle shots in which the horizon is visible), but it seems to do an equally good job for deep sky photography. In terms of workflow, I certainly found it easier to process the stacked image produced by Sequator. As you can see in the mouse-over comparison below, Sequator did a much better job of retaining the detail around the Trapezium area. There's less noise too, although the DeepSkyStacker version shows more of the fainter regions of the nebula.

It's also worth noting that Sequator did an excellent job of identifying and removing the light pollution gradient. DeepSkyStacker doesn't cater for this so I used the Light Pollution Removal tool in Noel Carboni's Astronomy Tools Actions set (which, despite having more user control, did on this occasion leave a series of contour lines in and around the brightest parts of the nebula). The Sequator stack did contain some colour noise, but this was easily removed using the Colour Blotch Reduction tool from the same set.
Other pros and cons: Sequator was fast (less than 30 minutes processing time compared to up to an hour for DSS). However, it also left some curious purple "appendages" around some of the brighter stars, as shown in the crop below:

I've seen Sequator described as "stacking for dummies" on one popular astro-forum, but on the above evidence I think it'll be this dummy's image-stacker of choice for the foreseeable future. This is by no means a rejection of DeepSkyStacker, but more likely an indication that I still haven't learned how to get the best out of it.
I like the colours better in the Sequator version too, although that's a matter of personal taste.
Which one do you prefer?
Purely based on your images and descriptions here, I prefer Sequator.
ReplyDeleteAnd go on, has inclusion of the phrase "grouping of four hot young stars" inadvertently brought you any extra traffic?
Thanks Finbar.
Delete