Showing posts with label deepskystacker. Show all posts

Saturday, 13 June 2020

Siril: Old Data, New Tricks

Siril (https://www.siril.org/) is a (relatively) new freeware program for stacking and processing astronomical images. I've been using it for a couple of months now and although I'm still very much in the learning curve stage, I'm already finding it to be significantly better than its freeware rivals.

Shown below is a crop of an image of Messier 33 (the Triangulum Galaxy), compiled from two hours of data and processed in Siril. Move your cursor over the image to see my previous attempt at processing the same data in DeepSkyStacker (DSS).
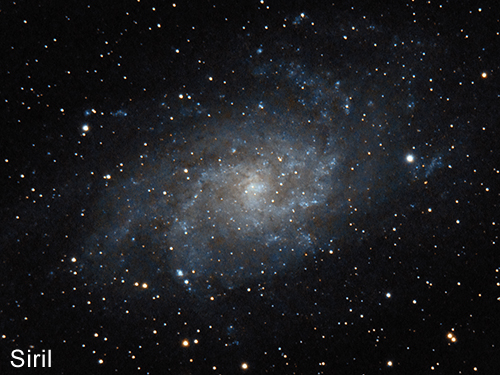
 

(The full-size version of this image is available on my Flickr page.) As you can see, the improvement is quite dramatic, particularly in the faint outer spiral arms where a wealth of extra detail is revealed. Siril also does a much better job of preserving the colour information from the original raw files. If you've used DSS to stack raw files you may have noticed that the colours come out very muted (as explained in this informative thread on Cloudy Nights). Prior to using Siril, my workaround was to stack the data again in Sequator (effectively using that as an RGB layer and the DSS output as a luminance layer), which always seemed an unnecessarily convoluted way of going about things considering I'm not a dedicated astro-imager.

So how does it work? Video tutorials and manuals are available online, but here's a quick step-by-step guide (applicable to version 0.9.12) to get you started.

When you install Siril it will create four sub-folders in your Pictures directory, one each for light frames, dark frames, flats and bias frames. Make sure your raw files are in the appropriate folders and from the Siril menu select Scripts > DSLR_preprocessing. (Variant scripts are available if you don't collect darks or flats or some other combination.) You'll need a generous amount of disk space because Siril will create individual fit files for every single raw file - but you can safely delete these once the process is completed (just don't delete your raws!).

A live Output Log window shows the script's progress. It takes between 30 and 60 minutes to run on my laptop (about the same time as DeepSkyStacker).

Upon completion, the script will save a file called result.fit in your Pictures folder. This is the linear 32-bit file (if you've used DeepSkyStacker it's equivalent to the autosave.tif file) and it will look excessively dark because most of the useful data is bunched over to the far left of the histogram. At this point I would recommend renaming the result.fit file to something more meaningful and keeping it somewhere safe, just in case you later find you've overcooked your histogram-stretching and want to have another crack at it.

The image will require a bit of work before it's ready for processing in Photoshop or whatever your preferred image editor is. Fortunately Siril has all the tools you need under the Image Processing menu.

First, change the Display Mode dropdown at the bottom of the image screen from Linear to AutoStretch or Histogram to get a better sense of the quality of your data. The Histogram display mode (like Equalize in Photoshop) is useful for showing the dark boundaries caused by tracking drift over the course of the imaging session. Draw a box on the image to exclude these dark areas and then right-click and select Crop. (You can always carry out a more precise crop later on in Photoshop.)

Siril image window in AutoStretch display mode

The Histogram preview will also show if there's a light pollution gradient in your image. Remove this by selecting Image Processing > Background Extraction. You can select background samples manually or click on the Generate button to have Siril select them automatically. Then click Apply to correct the image.

Change the display mode back to AutoStretch. The RGB image will now likely have a strong green tint. Remove this by selecting Image Processing > Remove Green Noise... and click on Apply.

Any remaining colour bias can be corrected by selecting Image Processing > Colour Calibration > Colour Calibration. Here you'll need to select an empty part of the background before clicking on Use Current Selection and then Background Neutralisation. Then repeat the process for the White Reference section (this time drawing a box around the brightest part of the image).

Now you're ready to begin stretching the image. Change the preview mode back to Linear and select Image Processing > Histogram Transformation. You may have to magnify the histogram to see where the data is. Drag the Midtones slider to the left and the Shadows slider to the right (making sure you don't clip your data). Click on Apply to apply the transformation. As you're probably aware, histogram stretching is an iterative process and will need to be repeated several times to get the desired result. (Hopefully the preview display modes will have given you an idea of where the data ends in your image and where the noise begins.) For images with complex dynamic ranges (such as the Orion Nebula) you may have to create two separate stretched images (one for the core and one for the fainter outer regions, and carefully layer them together in Photoshop).
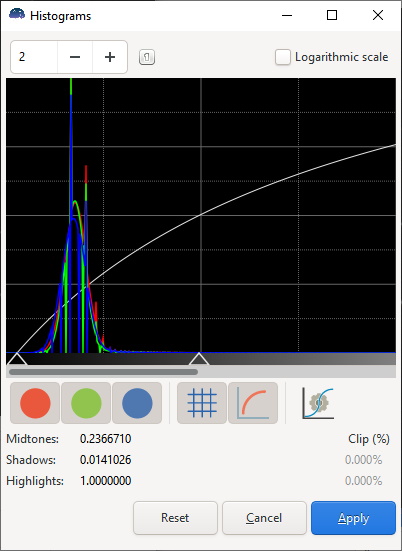
Siril histogram window

Other functions on the image processing menu which may be useful at this stage include Colour Saturation (for boosting the colour), Median Filter (for reducing noise), and Deconvolution (for sharpening) - although the latter does take a long time to run. Otherwise, you can export the image as a 16-bit TIF by selecting File > Save as... ready for finishing off in Photoshop or your image editor of choice.

Here's one more example, showing Messier 27 (the Dumbbell Nebula) in Vulpecula. Again, move your cursor over the image to see the original (DSS) version.
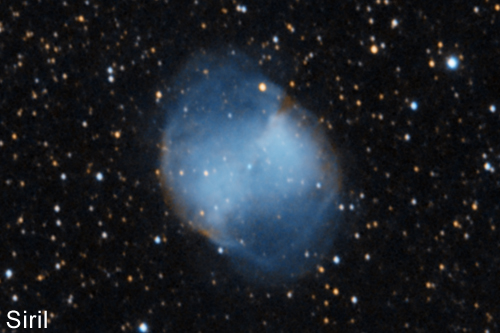
 

(A larger crop of this image is available on my Flickr page.) Detail-wise, the differences are subtle (because M27 is one of the brighter DSOs), but look closer and you'll see that the fainter outer regions of the nebula stand out more clearly in the Siril version. I also prefer the rich blue colour in the newer version. Which one do you prefer?

Sunday, 13 January 2019

Into the Orion Nebula

Orion Nebula (reprocessed)
M42, Orion: Tele Vue 60 + Canon 80D + Vixen Super Polaris
"An unformed fiery mist, the chaotic material of future Suns" - William Herschel, 1789 
Herschel's description (written long before spectroscopy revealed the true nature of gaseous nebulae) could hardly have been more prescient. The Great Orion Nebula (Messier 42) is indeed a cradle of new stars (at 1,300 light years, the nearest star-forming region to our own sun), visible to the naked eye as a misty patch in Orion's Sword on winter nights.

Viewing M42
I'm occasionally asked what it looks like through a telescope: a one-word answer would be "Majestic", but don't expect to see the full extent of the nebula - or indeed the vivid colours that you get in photos like the one above. As with most deep-sky objects, the Orion Nebula rewards careful and prolonged examination. Here's a sketch I made a long time ago (for GCSE Astronomy coursework!) illustrating the typical low-power view through a small telescope under suburban skies:


One telescopic feature you won't often see clearly in photographs is the Trapezium, a tight grouping of four hot young stars whose ionising radiation has helped sculpt the nebula into the shape we see today. In my 4-inch refractor the nebula is nicely framed in a 24mm Panoptic eyepiece (42x magnification) with layers of nebulosity building up to the core. Add in an Ultrablock filter to improve the contrast and the nebula takes on the appearance of a swooping bird of prey. With a 5mm Nagler (200x) under steady skies, a fifth member of the Trapezium is just visible.

So far the weather has only allowed me one opportunity to look at M42 with the XT10, but even under less than ideal viewing conditions it was immediately obvious that the extra aperture had improved the view dramatically. The core region had a strong green tint and averted vision made it so bright that the Trapezium was almost lost in the glare. Lots of finely detailed structure was visible with dark rifts cutting through the nebulosity. The Ultrablock filter wasn't really necessary for such a bright object, but it did seem to increase the overall extent of the nebula, particularly on the northern side.

Photographing M42
For any birders who've made it this far, the Orion Nebula is arguably to astrophotography what the kingfisher is to bird photography, the gateway drug that lures you into a lifetime hobby. (It even comes with its own fish, of a sort.) The image at the top of this post is a stack (not a mosaic) of 108 thirty-second exposures (plus 15 dark frames and 21 flat frames). As I'm still shooting unguided (for now) I've been careful not to choose targets too far away from the celestial pole, so at -5 degrees declination M42 presented the biggest test yet of my polar alignment accuracy. Fortunately the Great Nebula is a forgiving target - you can pull out a considerable amount of detail and colour even with relatively short 30-second subs. If you look closely, some slight trailing is evident, but not enough to spoil the final image.

Processing M42
As I've said before, acquiring all the light-frames (plus darks and flats) is only half the battle; there's still a lot of work to do. The image above was assembled using the freeware program Sequator. Compare it with my first attempt using the more widely-known freeware DeepSkyStacker. The samples on the Sequator website suggest it's optimised for landscape astrophotography (i.e. wide-angle shots in which the horizon is visible), but it seems to do an equally good job for deep sky photography. In terms of workflow, I certainly found it easier to process the stacked image produced by Sequator. As you can see in the mouse-over comparison below, Sequator did a much better job of retaining the detail around the Trapezium area. There's less noise too, although the DeepSkyStacker version shows more of the fainter regions of the nebula.


It's also worth noting that Sequator did an excellent job of identifying and removing the light pollution gradient. DeepSkyStacker doesn't cater for this so I used the Light Pollution Removal tool in Noel Carboni's Astronomy Tools Actions set (which, despite having more user control, did on this occasion leave a series of contour lines in and around the brightest parts of the nebula). The Sequator stack did contain some colour noise, but this was easily removed using the Colour Blotch Reduction tool from the same set.

Other pros and cons: Sequator was fast (less than 30 minutes processing time compared to up to an hour for DSS). However, it also left some curious purple "appendages" around some of the brighter stars, as shown in the crop below:


I've seen Sequator described as "stacking for dummies" on one popular astro-forum, but on the above evidence I think it'll be this dummy's image-stacker of choice for the foreseeable future. This is by no means a rejection of DeepSkyStacker, but more likely an indication that I still haven't learned how to get the best out of it.

I like the colours better in the Sequator version too, although that's a matter of personal taste.

Which one do you prefer?