Showing posts with label photoshop. Show all posts

Saturday, 13 June 2020

Siril: Old Data, New Tricks

Siril (https://www.siril.org/) is a (relatively) new freeware program for stacking and processing astronomical images. I've been using it for a couple of months now and although I'm still very much in the learning curve stage, I'm already finding it to be significantly better than its freeware rivals.

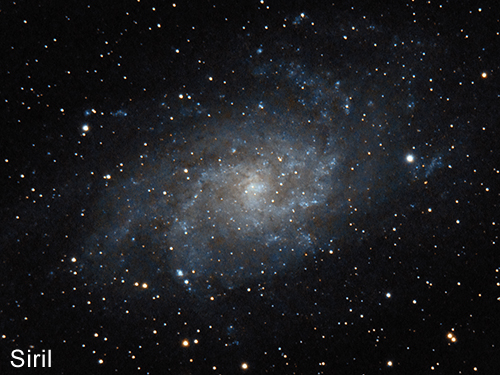
Shown below is a crop of an image of Messier 33 (the Triangulum Galaxy), compiled from two hours of data and processed in Siril. Move your cursor over the image to see my previous attempt at processing the same data in DeepSkyStacker (DSS).


(The full-size version of this image is available on my Flickr page.) As you can see, the improvement is quite dramatic, particularly in the faint outer spiral arms where a wealth of extra detail is revealed. Siril also does a much better job of preserving the colour information from the original raw files. If you've used DSS to stack raw files you may have noticed that the colours come out very muted (as explained in this informative thread on Cloudy Nights). Prior to using Siril, my workaround was to stack the data again in Sequator (effectively using that as an RGB layer and the DSS output as a luminance layer), which always seemed an unnecessarily convoluted way of going about things considering I'm not a dedicated astro-imager.

So how does it work? Video tutorials and manuals are available online, but here's a quick step-by-step guide (applicable to version 0.9.12) to get you started.

When you install Siril it will create four sub-folders in your Pictures directory, one each for light frames, dark frames, flats and bias frames. Make sure your raw files are in the appropriate folders and from the Siril menu select Scripts > DSLR_preprocessing. (Variant scripts are available if you don't collect darks or flats or some other combination.) You'll need a generous amount of disk space because Siril will create individual fit files for every single raw file - but you can safely delete these once the process is completed (just don't delete your raws!).

A live Output Log window shows the script's progress. It takes between 30 and 60 minutes to run on my laptop (about the same time as DeepSkyStacker).

Upon completion, the script will save a file called result.fit in your Pictures folder. This is the linear 32-bit file (if you've used DeepSkyStacker it's equivalent to the autosave.tif file) and it will look excessively dark because most of the useful data is bunched over to the far left of the histogram. At this point I would recommend renaming the result.fit file to something more meaningful and keeping it somewhere safe, just in case you later find you've overcooked your histogram-stretching and want to have another crack at it.

The image will require a bit of work before it's ready for processing in Photoshop or whatever your preferred image editor is. Fortunately Siril has all the tools you need under the Image Processing menu.

First, change the Display Mode dropdown at the bottom of the image screen from Linear to AutoStretch or Histogram to get a better sense of the quality of your data. The Histogram display mode (like Equalize in Photoshop) is useful for showing the dark boundaries caused by tracking drift over the course of the imaging session. Draw a box on the image to exclude these dark areas and then right-click and select Crop. (You can always carry out a more precise crop later on in Photoshop.)

Siril image window in AutoStretch display mode

The Histogram preview will also show if there's a light pollution gradient in your image. Remove this by selecting Image Processing > Background Extraction. You can select background samples manually or click on the Generate button to have Siril select them automatically. Then click Apply to correct the image.

Change the display mode back to AutoStretch. The RGB image will now likely have a strong green tint. Remove this by selecting Image Processing > Remove Green Noise... and click on Apply.

Any remaining colour bias can be corrected by selecting Image Processing > Colour Calibration > Colour Calibration. Here you'll need to select an empty part of the background before clicking on Use Current Selection and then Background Neutralisation. Then repeat the process for the White Reference section (this time drawing a box around the brightest part of the image).

Now you're ready to begin stretching the image. Change the preview mode back to Linear and select Image Processing > Histogram Transformation. You may have to magnify the histogram to see where the data is. Drag the Midtones slider to the left and the Shadows slider to the right (making sure you don't clip your data). Click on Apply to apply the transformation. As you're probably aware, histogram stretching is an iterative process and will need to be repeated several times to get the desired result. (Hopefully the preview display modes will have given you an idea of where the data ends in your image and where the noise begins.) For images with complex dynamic ranges (such as the Orion Nebula) you may have to create two separate stretched images (one for the core and one for the fainter outer regions, and carefully layer them together in Photoshop).

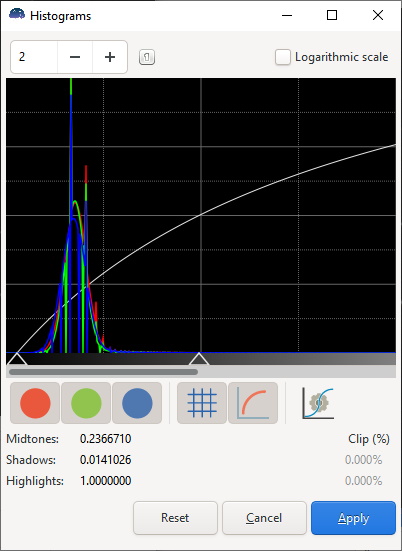
Siril histogram window

Other functions on the image processing menu which may be useful at this stage include Colour Saturation (for boosting the colour), Median Filter (for reducing noise), and Deconvolution (for sharpening) - although the latter does take a long time to run. Otherwise, you can export the image as a 16-bit TIF by selecting File > Save as... ready for finishing off in Photoshop or your image editor of choice.

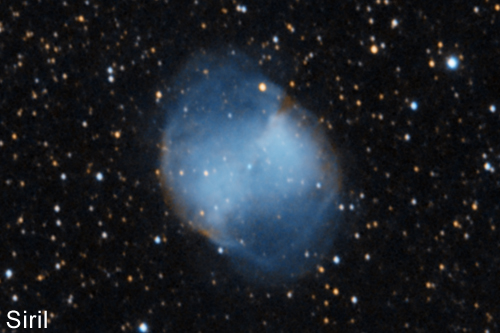
Here's one more example, showing Messier 27 (the Dumbbell Nebula) in Vulpecula. Again, move your cursor over the image to see the original (DSS) version.


(A larger crop of this image is available on my Flickr page.) Detail-wise, the differences are subtle (because M27 is one of the brighter DSOs), but look closer and you'll see that the fainter outer regions of the nebula stand out more clearly in the Siril version. I also prefer the rich blue colour in the newer version. Which one do you prefer?

Sunday, 8 January 2017

A few thoughts on Google's Nik Collection

Back in March, Google made the entire Nik Collection photo-editing suite available as a free download. Despite my initial scepticism (and wariness of filters that claim to replicate the "look" of film), I have to admit - now that I've been using it for a few months - it is actually really good and serves as a helpful complement to Photoshop. The Control Point technology is particularly useful for carrying out localised enhancements, saving a lot of time compared to manually creating masks.

Selective sharpening using colour range masking

Of course, no amount of software wizardry can turn a bad photo into a good photo, but with a little care you can get some interesting results, as shown below. (Note: my photo-editing steps are usually a lot more subtle than this. I provide these photos as examples because it's easier to see the difference.)

Move your mouse across the images to see them as they appeared before processing. Most of these results were achieved using Color Efex Pro, but the first image (the helicopter over the house) was enhanced using Silver Efex Pro to create a High Dynamic black-and-white luminosity layer.

Helicopter at North Foreland, April 2016 

Stodmarsh Hobby, May 2016

Bright Wake on a Dark Sea, November 2016

Common Tern, May 2016

Stodmarsh NNR, June 2016

The complete Google Nik Collection suite is available at:
https://www.google.com/nikcollection/
It works best as a Photoshop plugin (under the Filter menu), but you can also run each application as a standalone program if you create short-cuts to the individual .exe files.


Tuesday, 9 October 2012

Ocean of Storms

Oceanus Procellarum

At first glance Oceanus Procellarum (the Ocean of Storms) appears to be one of the less interesting regions of the Moon, presenting to the casual observer nothing more than a vast, monotonous plain of dark grey lava, dotted with the occasional impact crater. But look closer and you'll find evidence of ancient volcanism on a huge scale, unlike anywhere else on the lunar surface.

Here's a 100% crop showing the Aristarchus plateau - an diamond-shaped block of uplifted terrain dominated by the dazzling crater Aristarchus and the 160 km-long Schröter's Valley:


Easily visible in a small telescope, the valley is the largest and perhaps most dramatic example of a lunar rille, a sinuous channel cut (a very long time ago) by fast-flowing lava.

Follow the terminator south and you come to the Marius Hills, a complex of some 300 volcanic domes and hills that - through a small telescope - look like pimples on the lunar surface:


Lunar Orbiter 2 photographed the complex from an oblique angle, giving an idea of the relative height of the domes, and a few decades later the Japanese SELENE/Kaguya mission discovered an intriguing dark pit in the area (shown here in a high-resolution image taken by the Lunar Reconnaissance Orbiter).

Incidentally, if you move your mouse over the cropped images you can compare the finished versions with one of the original photos, illustrating the dramatic improvement that image-stacking can make to lunar photography.


See also:
Procellarum: The Biggest Basin?
Shooting the Moon: Lunar Photography with a DSLR and a Small Refractor

Sunday, 20 May 2012

Photographing Earthshine

Crescent Moon with Earthshine (revisited)

I generally try to avoid going back and tinkering with old photos because - as with any creative endeavour, whether it's writing a story, composing some music, or making a film - there comes a point where you have to say, "Enough's enough," and walk away from it. However, I was recently contacted by a production assistant at Popular Photography magazine saying they were interested in using my image "Crescent Moon with Earthshine" for a "How-to" feature in the June 2012 issue*.

The original image was composed back in April 2007 and close inspection shows quite a lot of noise and signs of oversharpening (as well as some obvious artefacts from where the two stacks were spliced together). I've learnt a lot about processing since then - and newer tools have become available - so I decided I could do a much better job if I went back to the source files and reprocessed them from scratch.

For those who are interested in the technical nitty-gritty, the images were taken using a Canon 350D (Rebel XT) DSLR connected to a Vixen SP-102 achromatic refractor (focal length 1000mm). Earthshine (which is the reflected sunlight from the earth illuminating the shadowed part of the moon) is easy enough to capture on camera, but normally results in a severely over-exposed crescent. To retain the detail on the crescent I shot 31 images at 1/60 sec, ISO 200, and to expose the earthshine I took 11 images at 0.5 sec, ISO 800. I then stacked and sharpened these images separately using the freeware tools AviStack and RegiStax, before combining them in Photoshop using a layer mask to create the finished version you see above.

This new "redux" version is a big improvement on the original, and is probably the best I could do given the quality (and quantity) of the original 350D image files. Some flaws are still apparent: the dark band between the earthshine and the crescent is a little distracting and the earthshine itself could be brighter. These are issues that could be fixed by capturing more images at a wider range of exposures - and then combining them using HDR software.

But that's a project for another day...

*And in case you're wondering, yes they did use it, and yes they did pay me.

See also:
Shooting the Moon: Lunar Photography with a DSLR and a Small Refractor
Earthshine (NASA Science)
Planetshine (Wikipedia)

Wednesday, 16 May 2012

Digital Darkroom: Liven up dull photos

Sometimes, despite your best efforts, what you hoped would be a good photo comes out looking a little dull. In my case it's usually because I wasn't able to get enough separation between the bird and the background, and/or it wasn't in direct light. Fortunately there's a four-step technique you can apply in Photoshop that will restore some life to your image without adding extra noise.
  1. Duplicate the background layer. (If your image already contains adjustment layers, combine them all into a new layer by pressing N followed by E while holding down the Shift, Ctrl and Alt keys.)
  2. Boost the Saturation by +75.
  3. Apply Gaussian Blur with a radius of 5 pixels.
  4. Change the blending mode of the layer to Screen and reduce the opacity to 10%. (You can control the strength of the effect by changing the opacity, but don't overdo it!)
Here's a before-and-after example for comparison. Move your mouse over the image to toggle the effect.

Eastern Black Redstart, Palm Bay, November 2011

The beauty of this technique is that you can record these steps as an Action in Photoshop and then apply them to any image with just a single click.

...or you could just download the Action I've already prepared for you here:

https://docs.google.com/open?id=0BySUCOFwHc1Celk1SU5md3NSUzQ

To install the file in Photoshop, go to the dropdown menu in the upper right corner of the Actions palette, click on "Load Actions..." and navigate to wherever you saved the file.

Of course, no amount of digital trickery is going to turn a bad image into a good image; nor is this method a substitute for proper adjustment of Levels and Curves etc., but it is a quick and easy way to improve images which require that little extra "punch".

Monday, 7 May 2012

2.5-Dimensional Slideshow

Those of you who visit my Flickr page may have already seen this, but a lot of work went into it, so I make no apologies for airing it again. All of the birds in this presentation were photographed in East Kent, and all of them were wild (even the Kestrel):


I say a lot of work went into it, but how much? Well, to create the pseudo-3D effect, you first have to isolate the foreground element (the bird) from the background. This is done in Photoshop by duplicating the background layer, adding a mask and painting it so only the bird is revealed. You then have to remove the bird from the background layer by careful application of the clone brush (or the Content-Aware Fill tool if you're lucky enough to own a newer version of PS). The next step is to import these layers into Adobe After Effects, place a suitable distance (z-space) between the foreground and background elements, create a virtual camera to track in (or out), choose positions for your start and end keyframes, decide on the length of time it takes the camera to move between these keyframes, and render the animation.

...and that's just one shot completed; now you have to do the same again for all the other images.

Here's a behind-the-scenes screenshot showing a typical camera move being set up in After Effects:


There's a lot of trial and error involved in getting it just right, but the process does become simpler once you've worked through a couple of images.

While synching all the shots to the cues in the soundtrack*, I found I had more clips than I needed, so here - for those who are interested in extras - are the "Deleted Scenes":


If I haven't put you off and you want to try making your own 2.5D slideshow, a step-by-step PDF tutorial can be downloaded from this page:
http://www.daynw.com/3d-for-2d-moving-image-slideshow-effect-tutorial/
Note: Even making just an 85-second video was very time-consuming; this is not the sort of project you can knock off in a single afternoon.

Incidentally, if anyone knows where I might find a tutorial that explains how to replicate all the After Effects steps in Blender, I'd very much appreciate it if you left a link in the comments.

*The music for the slideshow is of course Aquarium from Saint-Saëns's Le carnaval des animaux, used to such memorable effect in Terrence Malick's 1978 film Days of Heaven.

Saturday, 21 April 2012

Digital Darkroom: Seamless composites in four easy steps

This is the first in an occasional series in which I share processing tips and tricks.

If you've got two or more photos of a bird against a plain background (usually a blue sky), there's a quick and easy way to turn them into a composite image like this one:

Bittern (composite)
Bittern (composite), Grove Ferry, January 2012

As well as being fast, this method also avoids the unsightly halos often seen in composite photos where the sky colours don't quite match. The steps below apply to Photoshop, but most photo-editing programs will have similar functions.

1) Open one of the images you want to cut from, select the Magic Wand Tool (W) and click anywhere on the background sky. The "marching ants" outline will show you what's been selected.

2) From the menu, choose Select > Inverse. Now only the bird should be selected. If you find that other areas (like bright clouds) are still selected, switch to the Lasso Tool (L), click on "Subtract from Selection" on the Options bar, and simply draw a loop round the offending area to remove it.

3) Choose Select > Modify > Expand (1 pixel). This will ensure a smoother blend into the background sky. 

4) Click on Edit > Copy. You can now paste the selection into another image as a new layer, and position it with the Move Tool (V). Repeat these steps for any other images until you've built up your composite. (To save time, and to ensure consistency, I would leave any Levels or colour adjustments until after you've assembled the composite, rather than performing them on each individual image.)

Note: It's also worth pointing out that if you publish your finished work online, it's good practice to include the word "composite" somewhere in the title, lest anyone should think you really did capture four Alpine Swifts in a single shot...

Alpine Swift (composite), North Foreland, April 2010