Siril (
https://www.siril.org/) is a (relatively) new freeware program for stacking and processing astronomical images. I've been using it for a couple of months now and although I'm still very much in the learning curve stage, I'm already finding it to be significantly better than its freeware rivals.
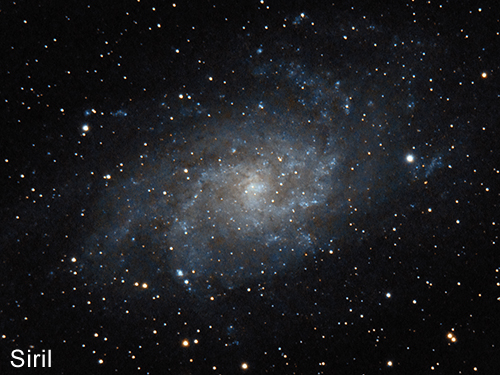
Shown below is a crop of an image of Messier 33 (the Triangulum Galaxy), compiled from two hours of data and processed in Siril. Move your cursor over the image to see my previous attempt at processing the same data in DeepSkyStacker (DSS).
(The full-size version of this image is available
on my Flickr page.) As you can see, the improvement is quite dramatic, particularly in the faint outer spiral arms where a wealth of extra detail is revealed. Siril also does a much better job of preserving the colour information from the original raw files. If you've used DSS to stack raw files you may have noticed that the colours come out very muted (as explained in
this informative thread on Cloudy Nights). Prior to using Siril, my workaround was to stack the data again in Sequator (effectively using that as an RGB layer and the DSS output as a luminance layer), which always seemed an unnecessarily convoluted way of going about things considering I'm not a dedicated astro-imager.
So how does it work? Video tutorials and manuals are
available online, but here's a quick step-by-step guide (applicable to version 0.9.12) to get you started.
When you install Siril it will create four sub-folders in your Pictures directory, one each for light frames, dark frames, flats and bias frames. Make sure your raw files are in the appropriate folders and from the Siril menu select
Scripts > DSLR_preprocessing. (Variant scripts are available if you don't collect darks or flats or some other combination.) You'll need a generous amount of disk space because Siril will create individual fit files for every single raw file - but you can safely delete these once the process is completed (just don't delete your raws!).
A live
Output Log window shows the script's progress. It takes between 30 and 60 minutes to run on my laptop (about the same time as DeepSkyStacker).
Upon completion, the script will save a file called result.fit in your Pictures folder. This is the linear 32-bit file (if you've used DeepSkyStacker it's equivalent to the autosave.tif file) and it will look excessively dark because most of the useful data is bunched over to the far left of the histogram. At this point I would recommend renaming the result.fit file to something more meaningful and keeping it somewhere safe, just in case you later find you've overcooked your histogram-stretching and want to have another crack at it.
The image will require a bit of work before it's ready for processing in Photoshop or whatever your preferred image editor is. Fortunately Siril has all the tools you need under the
Image Processing menu.
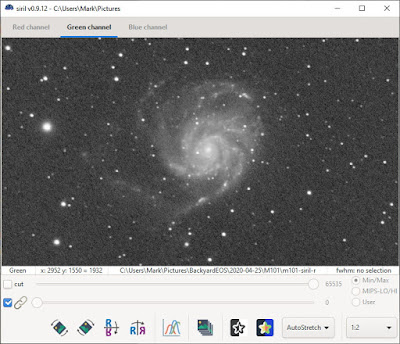
First, change the Display Mode dropdown at the bottom of the image screen from Linear to AutoStretch or Histogram to get a better sense of the quality of your data. The Histogram display mode (like Equalize in Photoshop) is useful for showing the dark boundaries caused by tracking drift over the course of the imaging session. Draw a box on the image to exclude these dark areas and then right-click and select
Crop. (You can always carry out a more precise crop later on in Photoshop.)
 |
| Siril image window in AutoStretch display mode |
The Histogram preview will also show if there's a light pollution gradient in your image. Remove this by selecting
Image Processing > Background Extraction. You can select background samples manually or click on the
Generate button to have Siril select them automatically. Then click
Apply to correct the image.
Change the display mode back to AutoStretch. The RGB image will now likely have a strong green tint. Remove this by selecting
Image Processing > Remove Green Noise... and click on
Apply.
Any remaining colour bias can be corrected by selecting
Image Processing > Colour Calibration > Colour Calibration. Here you'll need to select an empty part of the background before clicking on
Use Current Selection and then
Background Neutralisation. Then repeat the process for the
White Reference section (this time drawing a box around the brightest part of the image).
Now you're ready to begin stretching the image. Change the preview mode back to Linear and select
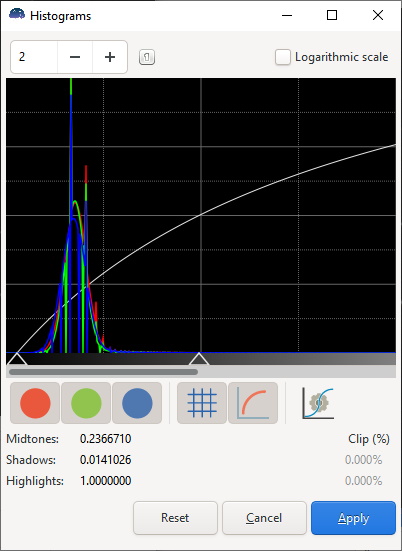
Image Processing > Histogram Transformation. You may have to magnify the histogram to see where the data is. Drag the Midtones slider to the left and the Shadows slider to the right (making sure you don't clip your data). Click on
Apply to apply the transformation. As you're probably aware, histogram stretching is an iterative process and will need to be repeated several times to get the desired result. (Hopefully the preview display modes will have given you an idea of where the data ends in your image and where the noise begins.) For images with complex dynamic ranges (such as the Orion Nebula) you may have to create two separate stretched images (one for the core and one for the fainter outer regions, and carefully layer them together in Photoshop).
 |
| Siril histogram window |
Other functions on the image processing menu which may be useful at this stage include
Colour Saturation (for boosting the colour),
Median Filter (for reducing noise), and
Deconvolution (for sharpening) - although the latter does take a long time to run. Otherwise, you can export the image as a 16-bit TIF by selecting
File > Save as... ready for finishing off in Photoshop or your image editor of choice.
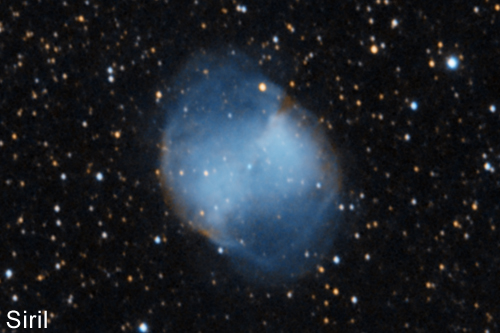
Here's one more example, showing Messier 27 (the Dumbbell Nebula) in Vulpecula. Again, move your cursor over the image to see the original (DSS) version.
(A larger crop of this image is available
on my Flickr page.) Detail-wise, the differences are subtle (because M27 is one of the brighter DSOs), but look closer and you'll see that the fainter outer regions of the nebula stand out more clearly in the Siril version. I also prefer the rich blue colour in the newer version. Which one do you prefer?

